Parts Management
Parts are the core item type in Cascadia PLM, representing manufacturing components and assemblies. The Parts module provides comprehensive tools for creating, managing, and tracking parts throughout their lifecycle.
Parts List Overview
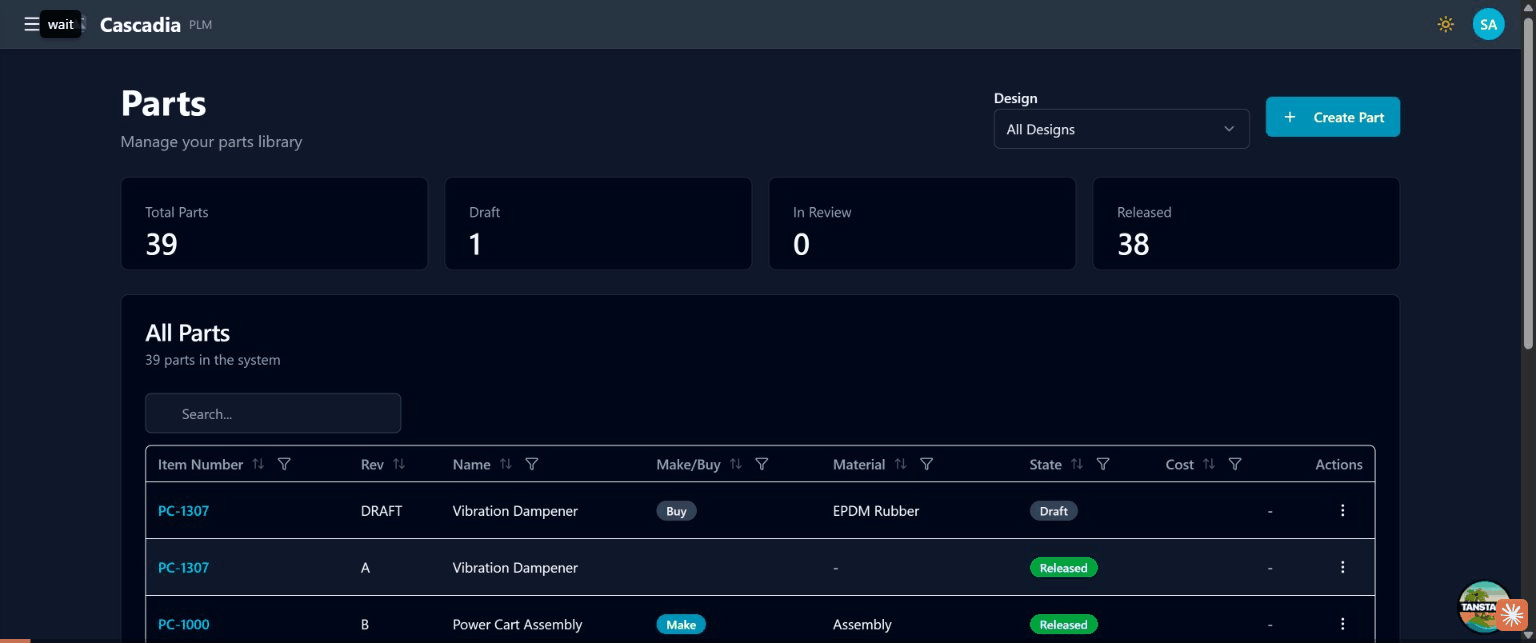
The Parts page displays all parts in the system with summary statistics and filtering options.
Summary Statistics
At the top of the page, you'll see four summary cards:
| Statistic | Description |
|---|---|
| Total Parts | Count of all parts (shows make vs buy breakdown) |
| Draft | Parts currently in progress |
| In Review | Parts awaiting approval |
| Released | Parts in production |
Filtering and Search
- Design Filter: Filter parts by design using the dropdown in the top right
- Search: Use the search box to find parts by item number or name
- Column Filters: Click the filter icon on any column header to filter by specific values
- Sorting: Click column headers to sort ascending/descending
Creating a Part
 Creating a new part: selecting a design, creating a workspace, and filling in part details.
- Navigate to Parts in the sidebar or click View Parts from the dashboard
- Click the + Create Part button in the top right
- Fill in the required fields:
Required Fields
| Field | Description |
|---|---|
| Design | The design this part belongs to (required) |
| Item Number | Unique identifier (auto-generated, e.g., P-1001) |
| Revision | Version identifier (default: A) |
Optional Fields
| Field | Description |
|---|---|
| Name | Descriptive name for the part |
| Description | Detailed description of the part purpose |
| Make/Buy | Whether the part is manufactured in-house (Make) or purchased (Buy) |
| Material | Material specification (e.g., Aluminum 6061, Steel, Assembly) |
| Weight | Component weight with unit selector (kg, lb, g, oz) |
| Cost | Part cost with currency selector (USD, EUR, GBP, etc.) |
| Lead Time | Manufacturing or procurement lead time in days |
- Click Create Part to save
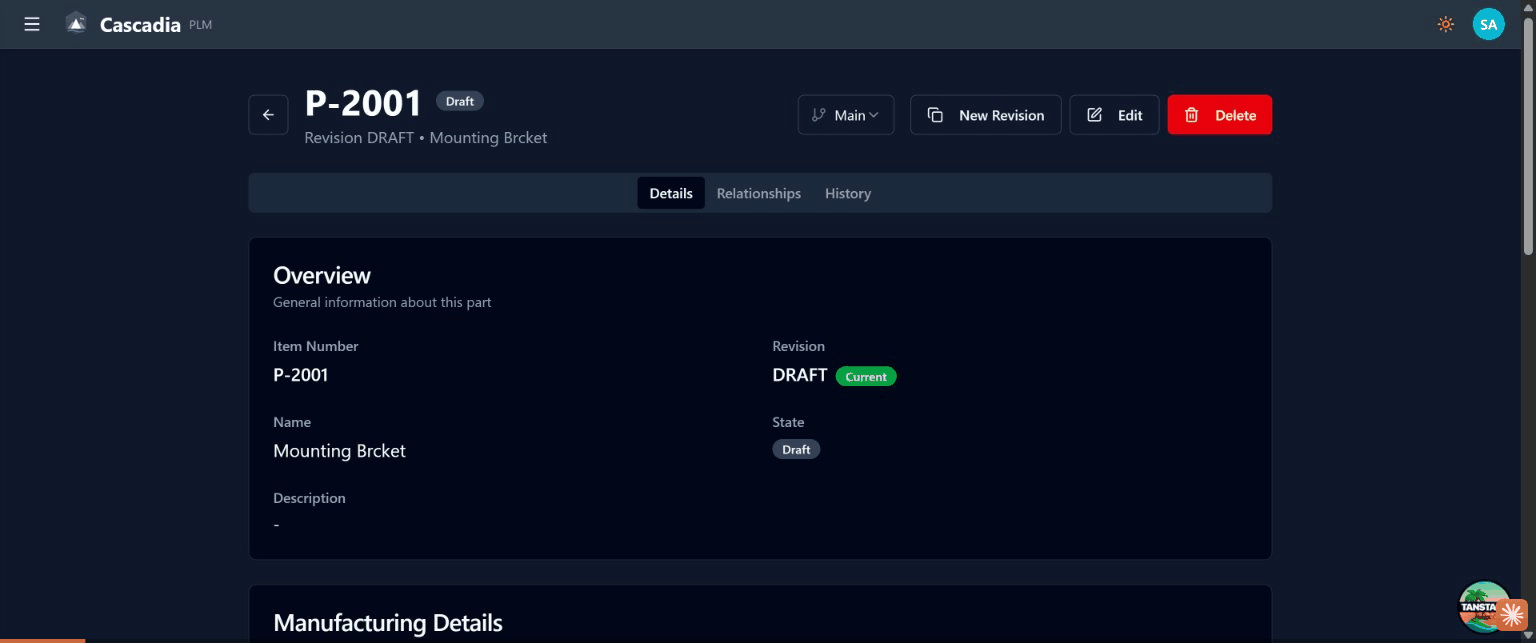
Part Detail View
 Exploring part details: viewing BOM relationships, relationship graph, and version history.
Click on any part number to open the detail view. The detail page has three tabs: Details, Relationships, and History.
Header Information
The header shows:
- Part number with state badge (Draft, Released, etc.)
- Current revision with "Current" indicator
- Part name
- Branch selector (Main or ECO branch)
- Action buttons: New Revision, Check Out, Delete
Details Tab
The Details tab displays:
Overview Section
- Item Number and Revision
- Name and State
- Description
Manufacturing Details Section
- Make/Buy status
- Material specification
- Weight and Cost
- Lead Time
Files Section
- Drag and drop area for file attachments
- Maximum file size: 500 MB
- Click Select Files to browse
Bill of Materials (BOM)
The BOM functionality is accessed through the Relationships tab on a part detail page.
Viewing the BOM
The BOM table displays:
| Column | Description |
|---|---|
| Find # | Sequence number (10, 20, 30...) for assembly order |
| Item Number | Part number link to child component |
| Rev | Revision of the component |
| Name | Component name |
| Type | Item type badge (Part, Document, etc.) |
| State | Component lifecycle state |
| Qty | Quantity required per assembly |
| Ref Designator | Reference designator for placement |
Adding Components
- Open the part detail view
- Navigate to the Relationships tab
- Expand the BOM section
- Click + Add
- Search for and select the child part
- Enter the quantity and optional reference designator
- Confirm the addition
Relationship Types
Parts can have multiple relationship types:
- BOM: Bill of Materials (parent-child assembly relationships)
- Custom relationship types can be added via + New Relationship Type
Relationship Graph
The Relationship Graph provides an interactive visualization of the BOM hierarchy.
Features
- Expand/Collapse: Click the arrow to expand the graph section
- Mode Selector: Choose "All relationships" or filter by type
- Depth Control: Set how many levels deep to display (1-5 levels)
- Zoom Controls: Use the +/- buttons or mouse wheel to zoom
- Pan: Click and drag to move around the canvas
- Navigate: Click any item number to navigate to that part
Graph Statistics
The graph displays statistics showing:
- Total items visible
- Total relationships
- Current depth level
Version History
The History tab shows the complete version history for a part.
Each history entry shows:
- Revision letter/number
- Change type badge (Modified, Created, etc.)
- ECO branch reference (e.g., "Merged ECO branch: eco/ECO-002")
- Date and user who made the change
- Previous revision reference
Click View to see the part as it existed at that revision.
Revision Control
Parts in Cascadia follow a controlled revision process:
Initial Creation
- New parts are created in Draft state
- Initial revision is typically "A" (configurable)
- Parts must belong to a design
Making Changes
- Released parts cannot be modified directly on the main branch
- To revise a part, create an ECO (Engineering Change Order)
- The ECO creates a branch where changes can be made
- When the ECO is released, changes merge to main and revision increments
Revision Sequence
- Standard sequence: A, B, C, D...
- Revisions are assigned automatically when ECOs are released
- Each revision maintains full audit history
Working with Branches
Main Branch
The main branch contains all released revisions. Parts on main are read-only and represent the current production state.
ECO Branches
When you need to modify a part:
- Create an ECO that includes the part
- Work on the part in the ECO's branch
- Submit the ECO for approval
- When released, changes merge to main
Branch Selector
Use the branch dropdown in the part header to:
- View the part on different branches
- Switch between main and ECO branches
- See which branch you're currently viewing
Checkout and Edit
Check Out
Click Check Out to lock the part for editing:
- Prevents others from making concurrent changes
- Required before making modifications on an ECO branch
- Shows who has the part checked out
Making Changes
After checkout:
- Click Edit to modify fields
- Make your changes
- Save to commit changes to the branch
- Release the ECO to push changes to main
Best Practices
Naming Conventions
- Use consistent part number prefixes (e.g., PC- for Power Cart)
- Include descriptive names that indicate function
- Document material and key specifications
BOM Management
- Assign find numbers in increments (10, 20, 30) to allow insertions
- Use reference designators for assemblies with multiple instances
- Keep BOM hierarchy depth manageable (typically 3-5 levels)
Lifecycle Management
- Keep draft parts in draft until ready for review
- Document changes in ECO descriptions
- Review where-used before making changes to understand impact
Next Steps
- Document Control - Managing technical documents
- Change Orders - Making controlled changes to parts
- Workflows and Lifecycles - Understanding state management